Getting Started with Vagrant and VirtualBox
In the following is a step by step guide to get you up and running with Vagrant and VirtualBox to run various operating systems, such as Ubuntu Linux, MacOS, Windows, etc. from your computer (the host).
Windows
Required Software
- VirtualBox
- Vagrant
- GitBash
Step-by-step Installation Guide
- Download URL: https://git-scm.com/download
- During installation choose the following:
- Use Git from the Windows Command Prompt with this option you will be able to use Git from both Git Bash and the Windows Command Prompt.
- Checkout as-is, commit Unix-style line endings
- During installation choose the following:
- Download and install VirtualBox https://www.virtualbox.org/wiki/Downloads
- The current version is 6.0.10 (Sep. 2019)
- Get it from here
- Download the extension pack too
- After installing VirtualBox, open it and click
File->Preferences->Extensionsand click the marked icon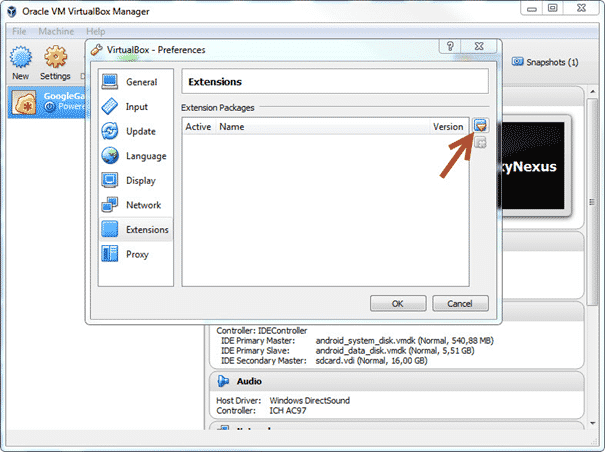
- Select the downloaded extension pack and then click
Install->I Agree->Yes
- The current version is 6.0.10 (Sep. 2019)
- Download and install Vagrant (https://www.vagrantup.com/downloads.html)
- Adapt the computer’s settings:
- Enable VT-X (Intel Virtualization Technology) in your computer BIOS/UEFI. (OBS You enter your BIOS after restarting the computer and hit a key like
F1,F2, up toF12orDELETE. Which button to press depends on the vendor and the model of you computer. Find that in your computer’s manual.) - Disable Hyper-V on program and features page in the control panel.
- Enable VT-X (Intel Virtualization Technology) in your computer BIOS/UEFI. (OBS You enter your BIOS after restarting the computer and hit a key like
- If you did not already generate an SSH keypair, generate one (e.g., via
ssh-keygen -t rsain GitBash) - Now everything is installed. See if you can run
vagrant --versionin GitBash.
MacOS
Required Software
- VirtualBox
- Vagrant
- Installed via
homebrew
Step-by-step Installation Guide
Install VirtualBox and the Extension Pack https://www.virtualbox.org/wiki/Downloads. The current version is 6.0.10 (Sep. 2019)
$ brew install virtualbox
$ brew install virtualbox-extension-pack
Install Vagrant (https://www.vagrantup.com/downloads.html)
$ brew cask install vagrant
$ brew install vagrant-completion
If you did not already generate an SSH keypair, generate one (e.g., via
ssh-keygen -t rsain GitBash)Now everything is installed. See if you can run
vagrant --versionin GitBash.
Linux
Required Software
- VirtualBox
- Vagrant
- Installed via
apt
Step-by-step Installation Guide
Install VirtualBox and the Extension Pack https://www.virtualbox.org/wiki/Downloads. The current version is 6.0.10 (Sep. 2019)
$ sudo apt-get update
$ sudo apt install virtualbox virtualbox-ext-pack
Install Vagrant (https://www.vagrantup.com/downloads.html)
$ sudo apt-get install vagrantIf you did not already generate an SSH keypair, generate one (e.g., via
ssh-keygen -t rsain GitBash)Now everything is installed. See if you can run
vagrant --versionin GitBash.
Creating Virtual Machines
Virtual machines (VM) are created from their specifications in a Vagrantfile. Get an example Vagrantfile with a description of a Windows 10, Ubuntu 16.04 and 18.04, and MacOS 10.14 VM-
Move that
Vagrantfileto a directory of your liking (<vagrant_dir>)Open a terminal (on Windows GitBash)
Start-up the VM:
$ cd <vagrant_dir>
$ vagrant up <vm_name>
The
<vm_name>with the givenVagrantfilecan be eithermacos,windows,ubuntu,ubuntu18The first time you run the
vagrant upcommand it will take a bit as it has to download the corresponding OS image. That is, to run this step, you have to be connected to the internet. Do not interrupt the process and keep track that potential errors.To log onto the virtual machine from the command-line after completion of
vagrant upexecute:$ vagrant sshAlternatively, you can login via the GUI. For all OSes, the GUI login name should be
vagrantand the password should bevagrant.Now, you should be logged onto the VM and you should see a Bash prompt similar to:
$ vagrant@vagrant:~$When you are done working on your VM, you can leave it by issuing the exit command.
$ vagrant@vagrant:~$ exitSubsequently, you can put the VM to “sleep” (just like closing the lid of your notebook) by running
vagrant suspendon your host machine.$ vagrant suspend <vm_name>Or you can stop the VM (just like pressing the power botton) by running
vagrant halton your host machine.$ vagrant halt <vm_name>In case you want to discard this VM just run
vagrant destroy <vm_name>from within the directory containing theVagrantfile.Hint In case you want to modify the configuration of the virtual machine, which will be created, you can do this now. Edit it with an editor of your choice. For example, to give the VM more RAM adapt the line
vb.memory = "6144"to a value of RAM in megabyte, which fits your host machine. That is, if you have 8GB of RAM and you want to give your VM 7GB of RAM change6144into7168.
References
This guide is adapted from earlier versions and from https://www.swtestacademy.com/quick-start-vagrant-windows-10/